

Neck Cooling Scarf
Neck Coolers are a great project (especially those with a fabric stash) it is fairly simple. The project involves the following materials. These coolers can be donated to the military, homeless, construction workers, pretty much anyone outside. Grab some friends and have a craft night!
Supplies:
-
Water beads or water crystals (craft or floral section of most stores)
-
Link to the beads we purchased (https://geni.us/py9xSV)
-
Cotton Fabric
-
Scissors/rotary cutter (optional)
-
Sewing machine
-
Iron
-
Pins/fabric clips
-
Measuring tape
-
Turning stick
-
Teaspoon
Step 1: Hydrate the beads
There are different size beads so it is hard to know how much they are going to expand. In a large bowl place 1 teaspoon beads to 3 cups of water. Beads take a couple of hours to fully hydrate.

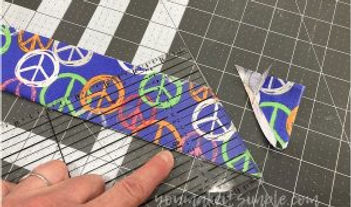
Step 3: Cut Edges
Fold the long edges of the fabric strip in half and cut off the edges at a 45 degree angle to form a taped edge
Step 5: Sew together
Using a straight stitch, start sewing at one corner all the way around to the other end. When you come to your pins/clips in the middles, backstitch and then lift up your presser foot and move to the next red clip. Backstitch and continue to sew the rest of the seam backstitching at the end.

Step 7: Turn Fabric
Using a turning stick, turn the tube right sides out

Step 9: Create pocket to hold beads
Fold the scarf in half and measure 10.5 inches from the fold and mark with a pin. This is where you will stitch the scarf to create the pocket that will hold the beads. You don’t want the whole scarf to be filled with beads, just the portion that wraps around the neck.

Step 11: Fill with beads
Now it’s time to fill the scarf with beads. Place a cookie sheet under your workspace so you don’t have beads rolling all over the place. Fill one side and then the other. Don’t overfill as they may expand a little more and pop the seam.

Step 13: Clean up
Clip threads and you're finished

Step 2: Cut a piece of cotton fabric
Most bolts of cotton fabric are 42-44 inches wide, from that cut a strip of fabric 4.5 inches

Step 4: Pin in place
Open up the strip and fold in half again with printed fabric facing inward. Find the center and mark a 4 inch space opening. This will help you remember where to stop and start sewing.

Step 6: Clip corners
Clip corners slightly at farthest tips

Step 8: Iron
In the are you left the opening fold in the excess fabric slightly and press. Press out the seams on the entire project.

Step 10: Sew vertical seams
Sew two seams where you marked with pins. Backstitch at the beginning and end of seam.

Step 12: Sew closed
Once the scarf is full, place the opening edges together and clip in place. You can hand-sew the opening closed or I use the sewing machine. I prefer using a 1/8 inch seam allowance on the sewing machine, it’s much quicker.

Usage
The beads will eventually dry up, but it takes several days. To re-activate the neck cooling scarf, just soak the entire thing in water for a couple hours. If you want to dry it out, just leave it in the sun. The beads will shrivel up to almost nothing, allowing you to store the wrap flat until the next time you need it.
